Vocabulary ideas

This past week was full of questions about how to study vocabulary for words you can not find associations to.  Vocabulary can be such a huge part of comprehension.  Here are a few ideas I have in mind.  

1. Word pictures

2. Foldables

3.Prefixes/Suffixes

4.Greek and Latin Roots

5. Background information


1.  Word pictures are great for those visual artistic kids.  By drawing a picture that represents the word, they remember it.  Visual learners will remember the picture when they see the word.  Other kiddos might do well with acting words out.  Create a game of charades with vocabulary words.  Take turns acting words out.  These kiddos that this work for are usually kinesthetic learners and will remember the words by how they were interpreted in action. 

2. FoldablesDinah Zike is the big name in foldables, however they have been around every since I can remember.  I love using this one in my classes by asking kiddos to set up their foldable before we start with the words.  A foldable is a sheet of paper folded so that a word can be on top and by lifting the fold, the description or definition or picture is revealed.  During a lesson, I might have students stop at points to draw a picture or write a definition of their word.  To see an example of a foldable, go here: http://www.csun.edu/~krowlands/Content/Academic_Resources/Foldables/Basic%20Foldables.pdf

3. Prefixes and Suffixes– Learn the list of prefixes and suffixes.  These are great for figuring out unknown words.  Even create a foldable to learn these. Talk about a cheat sheet.  These can be that cheat sheet you always wanted. http://www.prefixsuffix.com/rootchart.php

4. Greek and Latin Roots- Roots can be the most fun.  Take different greek or latin roots and combine them with prefixes or suffixes to make silly words that do not make any sense.  While someone can spend years learning these, it is worth your efforts and time. Go here to see a full list: https://www.msu.edu/~defores1/gre/roots/gre_rts_afx1.htm

5. Background information– Probably the most important part of learning vocabulary for Science or Social Studies is understanding the background information.  What is the setting of this vocabulary? Are we talking about the civil war?  Do we understand what the setting was like for the civil war?  It is only then that we may understand some of the vocabulary that originated from the time period. Don’t isolate vocabulary words.  Make them meaningful and a part of a bigger picture. If you don’t, they won’t stick. We all want them to stick…forever.


Need tutoring for your Struggling Reader (maybe dyslexic) and/or Mathematicians

Recently a teacher I have worked with as an online teacher for the past 5 years began her own tutoring services online using the essential requirements for struggling readers. She has extensive knowledge as a teacher of special education students specifically working with students with learning disabilities including dyslexic, dysgraphia and autism. I am most excited about her expertise with Barton Reading and Spelling (specialized program for dyslexic children).

Her tutoring services are offered online in an interactive, engaging environment that your child can participate in completely from their own home. Now, you may say, how can she help virtually? This is our expertise as online teachers. I do not get anything for recommending her to you, I am sharing because there are so many struggling students out there that just don’t have access to a specialized tutor. In the online environment, the students move tiles around, use a webcam, talk over the internet in the classroom and even write on the board themselves.  Check out Kids of the King Tutoring services and prices (which are completely economical). Check out these pictures of setups in her room.

Screen shot 2013-02-21 at 2.58.06 PM

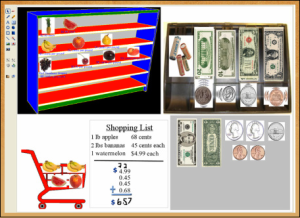
On this board, students can grab items off of the shelf, place them in their basket to buy and give the correct amount of money to the cashier.  They can also practice  making change by grabbing the money and giving it to the customer.

_________

Screen shot 2013-02-21 at 2.58.12 PM

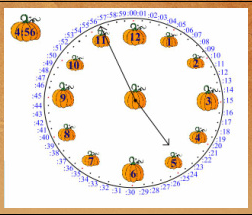
On this board, students can practice reading a clock  by moving the hands to the correct times given.

——–

———

———

———

———

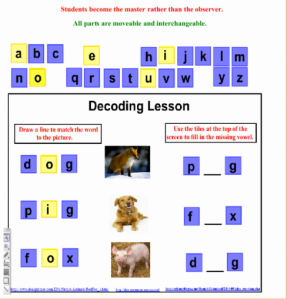
Screen shot 2013-02-21 at 3.01.09 PMOn this board, students can move tiles around and practice phonetic skills.  This is a one of the early levels of reading skills development.

Notetaking Strategies (Part 4) Mind-mapping

Mind mapping

This type of notetaking has been expanded to mean many things.  In this case we are focusing on using it for notes. It is strong and memorable strategy but takes time to become good at it.  Tony Buzan developed mind maps and you can go to this link to check him out.http://www.buzanworld.com/  There are resources and samples to see.  Here are my thoughts on it and my way of teaching it. The main point is to use pictures and key words for helping you remember concepts.  A mind map is made for each concept a student is learning or exploring but that concept can have subtopics within it.  If the concept changes completely, this is a new mind map. 

Here are the steps:

1. Gather a variety of colors of markers, crayons or colored pens or pencils.

2. Start in the center of a blank sheet of paper, preferably one without lines. Provide the main idea in the middle.  This can be a word or picture or a combination of a picture with a word.

2. Work outward from the main topic.  You would draw a line to a new subtopic out from the main idea.  . Continue that line with divisions or splits in the same color as long as the topic remains under that same subtopic.  Keep to images or key words only.  

3. Each time there is a new subtopic, it begins a new line from the main topic and you follow the same instructions as for step 2.  The lines for each subtopic should be color coded to make them easy to follow.

Some important things to keep in mind are that mind maps are meant to be quick reference and visual.  A mind map will stick to this list of ideas:

Organisation

Key Words

Association

Clustering

Visual Memory-key words, use color, symbols, icons, arrows and grouping of words.

Note:  This strategy needs a great deal of modeling and working with the student to improve their mind mapping abilities along the way. 

There are many computerized programs out there to assist in creating mind maps.  Personally I am a bit old fashioned when it comes to note-taking mind maps because finding the computer picture to fit the note sometimes just takes too much time.

Notetaking Strategies (Part 3) T-Notes

T- Notes

Please remember to read Part 1 on teaching someone how to take notes.  If you have not read those, please do not use any of the following information without reading it.

This strategies requires just a sheet of notebook paper. 

1. Prepare the sheet of paper. Fold the sheet of paper in half hot dog style, meaning vertically. Then draw a line where that fold was.

2. Find the main topic, a title for the notes. Write this at the top of the page on the title line if lined notebook paper.

3. Begin reading sections, when a new subtopic is introduced, you write on the left side of the line that subtopic.  Then on the right side of the line, right next to that subtopic, anything that comes across as important about that subtopic should be placed there in the student’s own words. 

4. Draw a line when a new subtopic is introduced and repeat the step above. 

*Note:  Sometimes it helps to use different colors for new sub-topics.  Making an entire topic one color until you move to the next sub-topic.  Also, you may always use pictures here in the place of words.

Notetaking Strategies (Part 2)-Sticky Notes

  Sticky Note Notes

This strategy entails having the student have lots of sticky notes.  Whatever size works for them and if they want lines or no lines, up to them.  The stared steps are not neccessary when reading a novel or story, only for content material like science, history, etc.

*Step 1:  Student glances though  and find subtitles and writes on individual sticky notes a phrase, one word or entire subtitle.

Step 2:  Begin reading, after reading a paragraph, page or section (depending on their level of reading comprehension and what can be retained) After each section, page or paragraph she is to write on the sticky note in own words main concept from that section or what happened in that section. 

Step 3:  Read next section, paragraph or page and repeat Step 2. 

The sticky notes above are actually stuck inside the book, preferably hanging off the edge and sticking out of the book.  These may remain in the book for a period of time or removed and placed inside a spiral notebook in order. Keeping them in the book, makes it easy to glance through sticky notes for a refresher on what was read yesterday and finding answers to comprehension questions.

Step 4: After the chapter, unit, section is read and complete, the student will want to remove the stickynotes and place them into a notebook in order.  This provides a quick summary of the entire material read in the student’s own words.   The student now has it all on a few pages.  It’s a beautiful thing.  A study guide is now ready for preparing for a test.

 *Please note that the notes written down can be done visually as pictures.  No one says the sticky notes have to have words on them.


Notetaking strategies (Part 1)

Recently, I have been working with some of my middle school/high school students on note taking strategies. It is sad really that when you walk into classrooms and ask teachers if they have taught their students how to take notes in their classroom about 9 out of every 10 I ask say, “No”.  The interesting part is that many of them require the students to take notes or they strongly encourage it and say, “You can use your notes for the test.” 

If a student does not know HOW to take the notes in a way that works for them, then the notetaking is useless.

We can not possibly expect students to be successful with taking notes without teaching it. It is important to remember that students need to take notes in a style that works for them.  They need to try a few different styles to find the right one for them. 

  It is essential that you teach them the strategy and not just give it to them and say, “Now do it.”

When using these you must practice this with them.

1. Model the strategy for them: This means read a section with them and you do it for them.  Before writing on each stickynote, say outloud what you are thinking.  This might be something like, “I think it was really important to know…”  You may also while reading, realize that you are already thinking about what needs to go on your notes. You read a sentence and say, wow! That’s important.  So say that out loud for them.  This is important.  Then go ahead if you feel the need and write that down on a note right then and then keep reading.  You can always add more paper or stickynotes.  You don’t have to fit it all on one. Include in your “thinking aloud” why you are choosing what you are choosing to write down.

2. Have them read the next section and discuss what they are choosing to write down.  Make sure they can say why they chose what they chose.

3.  If they really attached to the method and really get it, let them do several sections and then show it to you.  After a while, they are good to go, you don’t need to keep watching over how they are doing their notes.

4. If the strategy doesn’t stick and seem to be one they attach to Try Another One. 

I felt I should break the different strategies into different posts so please take the ideas here and apply them to the next few notetaking posts. I am only sharing a few strategies, there are many so don’t limit yourself to these. These posts include

Sticky Note Notes

T- Notes

Mind Mapping

Reading Fluency, Are they ready?

Ask these questions before you begin working on reading fluency.

  1. Can they recognize the letters of the alphabet and know the sounds of the consonants and short vowels?
  2. Can they put together common 3 letter words that use short vowel sounds?
  3. Do they know that words in sentences are read from left to right?
  4. Are they able to read 9 out of every 10 words of the first pre-primers you are using?

What do I do if they aren’t ready?

  Check out the other posts on Steps 1, 2,3 of beginning to read.

Reading Fluency, even further

 Now that you have begun to get reading and are starting to move beyond the simple words, it is time to move to the next level.  This would be books at the first grade level and above.

Begin by teaching the consonant blends. Sl, ch, th, wh, pl, bl,  etc.

  1. Work to create words using these consonant blends. 
  2. Do not teach more than 3-5 at a time until they are all learned.  A good complete list is located at www.firstschoolyears.com/literacy/word/phonics/clusters/clusters.htm . I have a short list below.
  3. Be sure to point these out in reading by having them look for them before reading a page.


Reading Time steps: 

  1. They read 1 page.
  2. They talk about what they read.
  3. If they are not reading fluently with expression, then you read, otherwise, they  read again.
  4. If you read, then they read again after you.

Remember that you are only doing 2-3 pages a day now.


Important notes:

  1. Don’t forget, you still do not allow them to guess.
  2. If sight word, give them to count of 3 in head to get it, then tell them.
  3. If a word that is to be sounded out, prompt them with, “What is the first sound?” before telling them the word by slowly sounding it out for them. Still do not allow them to guess.


Older kids

  •  Only work on this for no more than a ½ hour per day.
  • Focus on you reading to them or them listening to audio books for their basic academics. 
  • The reading will get there, and they need to practice reading skills at the lower level to build fluency. 
  • Discuss this with them and have them help choose those lower level books so that they are interested.


Sounds to teach and order-

Consonant Digraphs- ch, sh, wh, th, ph


Consonant blends- bl, cl, fl, pl, sl, spl, sc, sk, sm, st, str, sw, tw, br,dr,gr,cr,fr, tr, spr


Introducing Syllables

To teach them to break words into syllables to read them more easily try:

  • Placing hand under chin and feeling it move up and down and count syllables with words they are learning.
  • Write words for them to read that are separated into syllables.                            air  plane    turbo tax  care ful

 Use your library and the leveled readers section.

If you can, choose a series from the library and stick with it.  They each vary a little in how they level them and moving back and forth through them can feel strange.


Reading Fluency, Taking that next step

In this stage, words will become harder, it will take longer to learn new words and you will need to continue the use of index cards.

When you get past the first level of readers, and moveto the second level of readers from the library, there will be a need for a change in approach.


  • Check the book to see if your child will be able to read approximately 9 out of every 10 words .  If so this is an appropriate book. If you are unsure, let them read a sentence or two for you to check.
  • If the book passes the test, take the words they are unable to read and create flash cards with these words.  Practice these words.  
  • Do not begin the book until they recognize these words with automaticity. 


Continue daily reading practice with last book until these words are learned.  Don’t be discouraged, they begin to take longer to learn the words as the number of words in their vocabulary grows.


Procedure at this stage:

  1.  They read.
  2.  They talk about what they read, encourage them to use their words, not the books.
  3. You read.
  4. They read again.

 Continue using the index card to keep their place.


In this stage, you will want to continue

 to begin each day with a review of

  • any recently added sight words.
  • Using short vowel sounds to create 3 letter words

  • The lesson should still not take more than 30 min a day and do not read more than 2-3 pagesa day at this level.

Reading Fluency from the beginning


Sometimes patience is key in the first step of making sure they are ready.  Make sure they are definitely ready. Now that you have gotten the basic skills needed to begin working on fluency with reading.  Let’s get started.     


The first Book


First,  Make sure they are taught all of the sight word vocabulary for that book.  (if they don’t know, place on flash cards to learn)

Start with a book that does not have more than 2-3 lines on each page and 1 line to start is just fine.  Check with your local librarian for help in chosing books.  There are many different series that are leveled, they can direct you to them.

   If working with older student, collect a variety of books from the library, you will want to find a high interest area.   Once you have found the right books you will want to begin.


 Let them work to read the book, as they have already practiced all the words until they know them automatically with flash cards.  This should be doable. Here is the process:


  1.   Learn the words with flashcards to the entire book.
  2.    Look through the pages of the book, discuss the pictures.
  3.   Begin reading. 
  4.  They read page 1 once.
  5.  You read page 1 slowly once with excitement and meaning.
  6.  Then they read it attempting to mock reading it with meaning like you, they should point to each word as they read.
  7.  Discuss what they have read, checking for comprehension. 

 The books will begin to have more than 3 lines. When they do, do the following:


  1. Use a blank index card to cover all the lines below the first line that are not being read.  Student should see one line at a time.
  2. If they are unable to recall a word, count in your head slowly, 1,2,3 and then say the word for them.  Do not allow them to guess. Interrupt and give the word if they are attempting to sound out a sight word.  They are not meant to be sounded out.

Once they have read the page and you have moved the index card down the page, now have them slide the index card down as you read slowly with meaning as before.


  1. Have them read it aloud  with meaning and expression. Remember to give them words that they are unable to recall, not allowing them to guess.
  2. Discuss what happened on the page, checking for comprehension
  3. If there are words that are repeatedly missed, remember to practice these with flashcards daily prior to reading until they are learned. 
  4. You should not spend more than ½ an hour on this each day but at least 15 minutes. 
  5. You should read at least 2-3 pages at the preprimer level in each setting.
  6. Don’t forget to give lots of praise and recognition for accomplishments.


Lynnette Crawley M.S. Ed

As an educational consultant, I work with families, students, adults, parents, teachers, schools and corporations in relationship to the many disabilities affecting their lives. Many times all anyone needs is a little coaching, direction or tools to close the gap between where they are and where they should be. Making progress is not good enough. We must be closing the gap. Email: everyonecanlearn@ymail.com

Donate to American Heart Association

My son is raising money for the American Heart Association. Show your support by giving to the link above!